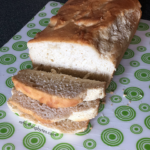
Gluten Free Sandwich Bread Recipe (Dairy Free)
This gluten free sandwich bread recipe has a soft, fluffy texture and moist crumb that will keep you coming back for more! It's easy and delicious. Enjoy eating again!
Ingredients
Yeast Mix
- 1.5 cup dairy free milk unflavored & warmed
- 3 Tbsp honey sticky sweetener
- 2.5 tsp active dry yeast (1 packet, not expired)
Dry Mix
- 3.5-3.75 cups Erika's All Purpose GF Flour Mix
- 1.5 tsp psyllium husk in addition to GF mix
- 4 tsp baking powder
- 1 tsp salt
Wet Mix
- 2 tsp apple cider vinegar
- 1/4 cup olive oil
- 2 eggs room temperature
Instructions
-
Preheat your oven to 375 degrees Fahrenheit.
Yeast Proofing
-
In a measuring cup, measure and heat milk so that it is warm to the touch, like a warm bath, but not steaming.
-
Spray your measuring spoon with non-stick spray and measure/pour honey into the warm milk and stir.
-
Whisk in yeast and set aside for 10 minutes. There should be a good 1/2 inch of foam (looks like beer head) on the top.
Dry Mix
-
Combine Dry Mix ingredients in a medium bowl.
Wet Mix
-
Combine Wet Mix ingredients in a stand mixer with a Flex Edge beater. This will scrape the sides while mixing. Mix until just combined (for a few seconds).
-
Add the proofed yeast mix and mix again until just combined.
Mixing It Up
-
Add the Dry Mix gradually, and beat on medium-high for 3 minutes. Dough will be thick and sticky, about the consistency of a sugar cookie dough. (If you turned the bowl upside down, it wouldn't run out of the bowl. Think DQ Blizzard!)
-
Spray your loaf pan with non-stick coating if needed.
-
Scrape the dough into your loaf pan.
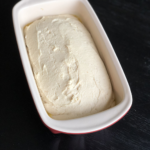
-
SMOOTH out the dough with a spatula (sprayed with non-stick coating works best). Don't skip this step.
Let It Rise
-
Cover the loaf pan and place it on top of the stove for 20-30 minutes to rise.
-
Do not let the loaf rise above your loaf pan or crest to the top. It will collapse and your bread will flop.
-
Bake for 35-45 minutes, depending on loaf pan, in the middle rack. (With the loaf pan I recommended, it takes 45 minutes.) and the color will turn a nice medium shade of brown.
-
REMOVE the loaf from the pan WITHIN 1-2 minutes of removing it from the oven, or it will collapse.
-
DO NOT cut the bread until COMPLETELY cooled, or it will pill and tear and get mushy.
-
STORE cut side down in a paper bag up to 2 days. For longer term storage, wrap "accordion style" in plastic wrap and freeze in a freezer bag.
DO NOT store loaf in a plastic bag at room temperature or it will get mushy!